


Grow your own food and flowers with Belgian’s Seeds and Seed Starting Supplies! Check out our full seed selection, available from January through August, including a wide variety of Vegetables, Herbs, Annuals, Perennials, and heirloom seeds from the Ontario Seed Company (OSC). We offer a select assortment of seeds from September through December. We also carry seeding supplies such as seed trays, soilless potting mixes, coir pellets, misters, and fertilizers that are available year-round. Bagged lawn seed is available from spring until fall; we do not sell bulk lawn seed.

Success with Starting Seeds at Home
Starting Seeds Indoors
Starting your own seeds can be a fun, cost-effective way to get your garden growing! There is a dizzying array of seeds available to modern gardeners, and growing from seed can help expand your plant family with new or unusual varieties. Vegetables are some of the most satisfying and popular plants to grow from seed, and there are so many unique cultivars that are rarely seen in modern grocery stores. Growing from seed will also give you complete control over your plants, including the use of any fertilizers or insecticides – a main concern for those committed to organic and/or pesticide-free gardening.
Start Small & Timing
It’s very easy to let your enthusiasm get the better of you while browsing our seed racks. Remember to keep your seeding quantities manageable by giving your seedlings plenty of room to grow, both in their pots and in your home! Seed starting heavily relies on timing: seed packets will indicate the best time to start by referring to the number of weeks before the last frost (in our area, this is usually around the end of May). Count back from the Victoria Day weekend to estimate the optimal time to start your seeds.
Your Seeds’ First Home
Seeds can be started in almost any container of suitable size that is clean (preferably sterile) and has good drainage. Small yogurt containers with holes drilled in the bottom work well, as do plantable coir pots. Do not use a pot that is too large, as excess soil will hold too much moisture and encourage rot and mould. Seed trays are perfect for growing larger numbers of seedlings and many come with a plastic dome to help contain humidity (most seeds require relatively constant moisture when first sprouting). Other types of containers can be enclosed in a clear plastic bag until sprouted. Remove this covering for ventilation once the leaves have emerged.
Let There Be Light!
Good lighting is essential to growing strong seedlings. Even in a space with excellent natural light, supplemental lighting is beneficial as your seedlings will perform best with 12 – 18 hours of good strong light each day. Special horticultural lights offer a big boost to your growing plants but standard fluorescent bulbs do the trick, too. Keep your lights about 4 – 6” above your plants and be prepared to raise them up as your seedlings grow.
Heating and Air Flow
Most seeds germinate well in average house temperatures, though some require a little extra heat to sprout (check your seed packets for specific recommendations). Special seed heating mats are great for seeds that need that extra couple of degrees to wake up. Once your seedlings are growing, slightly cooler temperatures can help slow them down, keeping them strong and compact. Extra ventilation, such as a small fan on a low setting, is also beneficial at this stage as good airflow helps prevent mould and fungal diseases, and will encourage your plants to stay stocky.
Water Lightly and Often
A good watering schedule is extremely important to young plants. Be prepared to check on your seedlings 2 or 3 times every day! They should not dry out, but don’t get them too wet either. Seedlings are delicate and require a light touch; a mister or fine spray bottle is a great way to gently water without flattening delicate sprouts. If possible, avoid watering late in the evening. Young plants do not require fertilizer until they have 3 or 4 growing leaves. Use a weak solution of fertilizer every two weeks, but only once plants have started growing vigorously.
A Difficult Sacrifice (Thin Them Out!)
As seeds grow, they will need more space to spread out without the danger of overcrowding. If your seedlings are in individual pots, you can space them out easily, while seeds started in plug trays or smaller pots will need to be potted up into slightly larger containers until planting time. You may find you have more seedlings in your pots than you intended. It may seem cruel, but these extra seedlings have to go for the greater good of your crop. Whether in pots or seeded in the garden, cut them off at the soil level with a sharp knife or scissors; pulling up seedlings can disturb the other tender roots of those you intend to keep. Some thinned vegetable seedlings make great microgreens, including broccoli, beets, beans and peas.
Hardening Off and Planting Out
Now it’s time to take your carefully raised seedlings and introduce them to the outside world. Seeds started in the perfect comfort of indoors need to be “hardened off”: acclimatized to the wind, sun, and temperature variations of outdoor living. To harden off your seedlings, gradually introduce them to the elements over a few days. Leave them outside for a few hours in the morning, then bring them back inside. The following day, leave them outside all day long and bring them back in at night. The next day you can leave them out day and night, and by the fourth day they are ready to move out permanently. Be sure to consult the weather forecast before planting your seedlings outside as most are very sensitive to frost. Some crops, including eggplants, melons, and peppers, like their outdoor homes to be warmed through, so it’s best to wait until mid-June before planting these heat-loving crops.
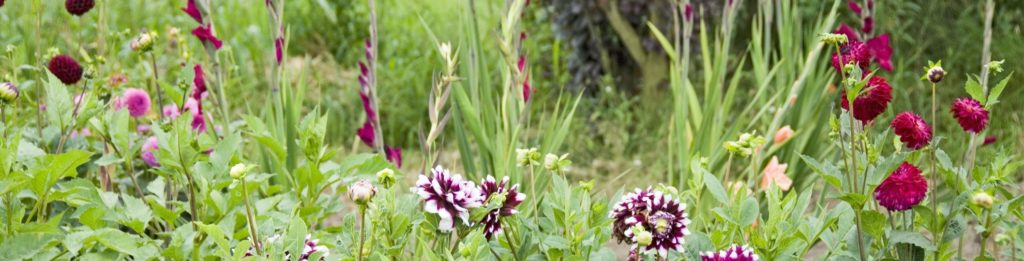
Spring Bulbs & Tubers
Dahlia, Gladiola, Hybrid Lily, Calla Lily, Freesia, just to name a few! Spring bulbs and tubers are planted in spring, either directly outside after the threat of frost has passed, or starting early indoors for those gardeners who are too excited for planting. The summer heat will bring about their vivid colours, adding unique beauty to your gardens and porches. In the fall, some varieties will need to be lifted and stored in a cool, dry location for the winter months (read below for further details). Belgian’s spring bulbs and tubers arrive mid-March through April, though some varieties can sell out quickly.
Choosing your Bulbs
Belgian carries a beautiful assortment of Spring Bulbs every spring, with the best selection typically arriving in mid-March. Look for bulbs and tubers that are large for their variety, firm to the touch, and free from mould and rot.
Starting Early
Many bulbs can be started indoors in late winter or early spring. Agapanthus, Begonias, Dahlias, Oxalis, Ranunculus, and Calla Lilies all make beautiful houseplants until they can be taken outside. Once the risk of frost is passed, be sure to gradually introduce your plants to the elements by “hardening them off” before planting (see “Hardening Off and Planting Out” in the Seed section).
Choosing and Laying Out your Site
The majority of bulbs are very easy to care for when planted in a suitable location. Your planting site should be in full to part sun with loose soil and excellent drainage (most bulbs prefer to be on the drier side). For a formal look, plant masses of bulbs closely together in distinct areas of your garden. Or go for a more natural look by scattering bulbs among your late blooming Perennials. Have fun experimenting with different patterns and colour combinations!
Planting
Spring bulbs can be planted once the risk of hard frost has passed. Your bulb’s packaging should indicate the optimal planting depth and spacing for the variety. After you have loosened your soil, dig a hole of the appropriate depth for the bulb or tuber you are planting. Hand trowels, dibbers, and specialty bulb planters are all good tools to get the job done. Add nutrients to your planting by mixing in a handful of compost, a sprinkling of blood meal, or bulb fertilizer at the bottom of your hole. Place your bulbs in their hole with the root end down.
Once your bulbs are in place, replace the soil gently to keep them upright and pat down. If you’re worried about critters digging up all your hard work, scatter some hen manure around your planting site as both a fertilizer and squirrel deterrent. Water well and wait for summer’s warmth to reveal the fruits of your labour!
Bulb Maintenance
Most bulbs are very low maintenance. Remove spent flowers by cutting just below the bloom. Bulbs need their foliage left in place in order to build up energy for next year’s flowers, so wait until the leaves and stems turn completely brown before removing them. During the growing season, bulbs will appreciate an added layer of compost or a sprinkle of garden fertilizer.
Dividing
Dividing bulbs, tubers, and corms is an easy way to propagate your favourite varieties and also rejuvenate any overgrown areas. It’s best to divide your tender bulbs before planting out in early spring. For true bulbs like Hybrid Lilies, remove their offsets (smaller bulbs growing off of the parent) for planting. Tuberous roots like Dahlias and Begonias can be divided by cutting into segments, with each having at least one bud or eye; cure the cut pieces in a dry place for a couple of days before replanting. Corms like Freesia or Gladiolus produce offsets which are similar to true bulbs, and can be dug up and replanted to propagate. Rhizomes like Calla Lilies can be divided when the plant is not in flower – dig up the rhizome and divide so that each section contains at least one fan of leaves, discarding any leafless sections and replant immediately or put into storage.
Lifting and Storage
Many tender bulbs can be saved for the following year if dug up and stored before fall frosts. Gladiolus, Dahlias, Cannas, Freesias, and Begonias are all great candidates for lifting. After the first light frost in the fall, dig up your bulbs and shake them free of soil. Clip back any remaining foliage and allow the bulbs to dry. Store your bulbs and tubers in a breathable container and place in a cool, dark, dry spot. Vermiculite, peat moss, sphagnum moss, and even newspaper all make excellent packing materials. Space your bulbs within their container so that they are separated – if moisture creeps in and causes one bulb to rot, it can quickly spread to its neighbours if they are packed in too tightly. Check on your bulbs periodically and discard any that look unhealthy. Replant in the spring once the risk of frost has passed.

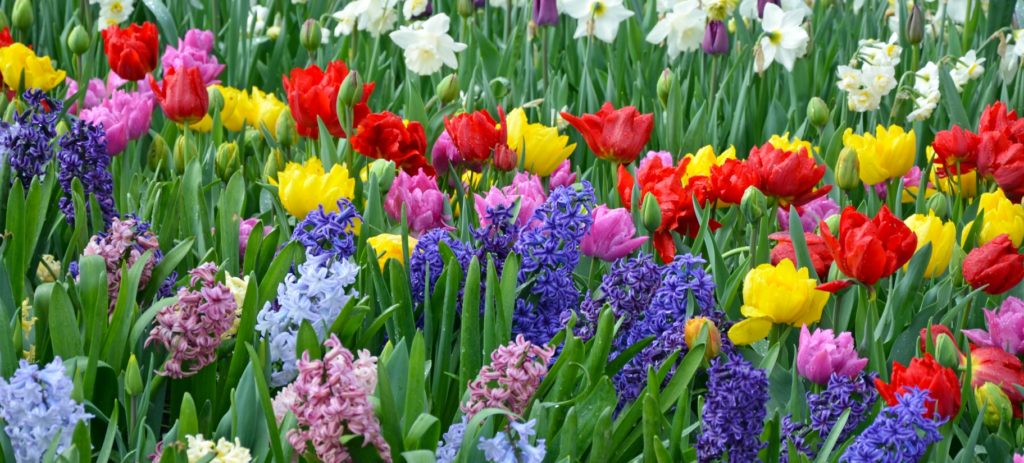
Fall Bulbs (Spring Flowering)
A little planning goes a long way! Every fall, Belgian’s Main Store is filled with thousands of Fall bulbs including Tulips, Daffodils, Narcissus, Hyacinths, Allium, Snowdrops, Grape Hyacinths, and Crocus. The best selection can be found in early to mid-September. Plant them before the ground freezes to enjoy bursts of colour in early spring!
Naturalizing bulbs, which include Daffodils, Narcissus, Crocus, Allium, and Hyacinths, will multiply year after year and provide a rush of brilliant spring colour, especially when planted amongst Perennials. Other bulbs, like Tulips, are best planted annually as most of their energy is spent producing their large, showy flowers in their first spring.
Bulbs aren’t just for gorgeous flowers; you can also plant them to extend your vegetable garden! Belgian carries different varieties of Garlic in the fall, which can be planted just like your Tulips and Daffodils for delicious spring flavour. In spring we’ll have Onions and Seed Potatoes available which, depending on variety, should be ready for harvest through summer into fall.
Choosing Your Fall Bulbs
Look for bulbs that are large for their variety and firm to the touch. Most fall bulbs will be marked as either early-spring, mid-spring or late-spring bloomers. Select varieties from each group to extend your flowering season, or keep to one bloom time for one spectacular display!
Site Planning
The majority of bulbs are very easy to care for when planted in a suitable location. Your planting site should be in full to part sun with loose soil and excellent drainage. For a formal look, plant masses of bulbs closely together in distinct areas of your garden. Or go for a more natural look by scattering bulbs among your late blooming Perennials. Have fun experimenting with different patterns and colour combinations!
Fall Planting
Fall bulbs can be planted anytime before the ground is frozen. The depth of hole should be 2.5 to 3 times deeper than the diameter of your bulb; see our Planting Depth Guideline for more details. For larger groupings of bulbs, consider digging one big hole or trench. Add nutrients to your planting by mixing in a handful of compost, a sprinkling of blood meal, or bulb fertilizer at the bottom of your hole.
Place your bulbs with the root end down. Some bulbs, like Fritillaria, need to be planted on an angle – check the packaging for any special instructions. Once your bulbs are in place, replace the soil gently to keep them upright and pat down. If you’re worried about critters digging up all your hard work, scatter some hen manure around your planting site as both a fertilizer and squirrel deterrent. Water well and wait (impatiently) for spring to reveal the fruits of your labour!
Maintenance After Flowering
Most bulbs are very low maintenance. Remove spent flowers by cutting just below the bloom. Bulbs need their foliage left in place in order to build up energy for next year’s flowers, so wait until the leaves and stems turn completely brown before removing them. Established bulbs will appreciate an added layer of compost or a sprinkle of garden fertilizer in the fall.
Naturalizing bulbs, such as Narcissus, Crocus, and Hyacinth, will increase in both size and quantity over their years in the garden. However, most Tulips give their all in their first spring, so many gardeners treat them as annuals and replace their varieties every fall. There are naturalizing and wild Tulips varieties that will multiply and spread to form an expanding clump over the years.
Dividing
Dividing bulbs is an easy way to propagate your favourite varieties and also rejuvenate any overgrown areas. After your bulbs have finished flowering and their foliage has faded for the year, dig up the clump and shake off the excess soil. Remove the offsets (small bulbs growing off of the parent bulb) and transplant into their new area.
Lifting and Storage
Naturalizing fall bulbs do not need to be lifted at any time of the year, though many gardeners choose to dig up their bulbs after flowering to make room for summer bedding plants. Be sure to wait until the foliage has died back as much as possible before lifting your bulbs. Dig up your clump and shake the bulbs free of soil. Cut back any remaining foliage and allow the bulbs to dry. Store your bulbs in a breathable container and place in a cool, dark, dry spot. Vermiculite, peat moss, sphagnum moss, and even newspaper all make excellent packing materials. Space your bulbs within their container so that they are separated – if moisture creeps in and causes one bulb to rot, it can quickly spread to its neighbours if they are packed in too tightly. Check on your bulbs periodically and discard any that look unhealthy. Replant in the spring once the risk of frost has passed.
Planting Depth & Spacing
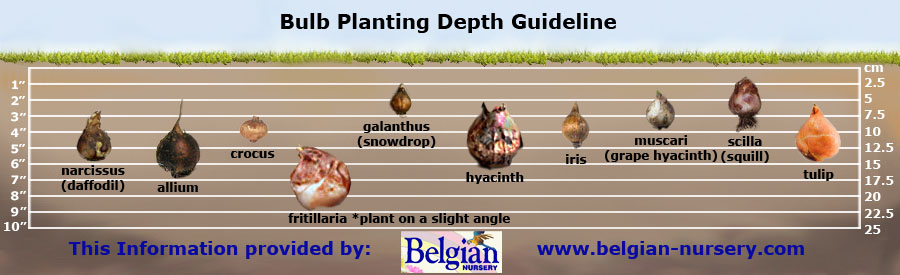
The general rule of thumb for planting bulbs is to plant them with their base sitting at a depth that is 2.5 to 3 times the diameter of the bulb. Most bulbs appreciate 3 times their width for spacing, but you can plant your bulbs closer together for a more dramatic display if desired (leave adequate space if you want your bulbs to naturalize and multiply). Most bulb packages will state their precise planting depth and spacing.
Forcing Bulbs Indoors
“Forcing” is a term used to describe the process of stimulating a plant to flower early or outside of its natural season. This effect is usually achieved by inducing a cold period to simulate winter. To force your bulbs, plant them in a pot at least 6 inches deep and filled with moist potting soil. You can pot one or several bulbs into each pot depending on your desired look. Place your pots in a cool, dark environment that does not freeze, such as an unheated garage or a spare refrigerator. Most bulbs need to be chilled to about 9°C (50°F) for a period of 12 to 16 weeks, depending on the variety (see the chart below). They will need to be watered periodically during this time, but do not allow soil to get soggy. Once your bulbs develop pale shoots, they are ready to come out the cold and you can start gradually introducing them to light and warmth. Your flowers aren’t far behind!
| Bulb Variety | Cooling Time |
| Hyacinth | 11 to 13 weeks |
| Tulip | 13 to 17 weeks |
| Narcissus (Daffodil) | 12 to 15 weeks |
| Crocus | 14 to 15 weeks |
| Muscari (Grape Hyacinth) | 14 to 15 weeks |